3D ePUB icon for my articles about Self
For quite long time, I had in my TODO to "add ePUB icon for the 📂Series about Self". Up until today, I had the ePUB file saved in my personal wiki, and the export to HTML looked weird. Just some kind of rectangle with link in it:

Originally, I had nothing fancy in mind. Just slap some kind of open source / Creative Commons icon in the place, so it will look nicer. I quite liked the first one I've found via google, but it wasn't properly licensed and author required that you give him credit. Nothing against that, but it seemed like overkill for my usage to dedicate part of the page for giving credit.

The shape of 3D book gave me an idea to try to create simple 3D model. I've decided to fire up Blender and do quick lowpoly model. I've had a pause from 3D modeling for maybe a month and in the meanwhile, new Blender version was released. To celebrate, Blender forgot my custom settings, which is probably my fault, because I didn't create custom config file and just trusted that it will remember my settings. It did not.
It took me just a moment to create book shape from default cube, add a bevel to one side, so it is rounded and then add small bevel to all corners, so they look more organic.
I've then duplicated the shape, scaled it down, added a boolean modifier which cut the scaled down shape from the bigger shape. Then I've applied the modifier and added a lot of loopcuts to it, so it will look like pages. I've also done some proportional editing to shuffle the "pages" around, so they look like they are curved in spine of a book. Here is the result:

I've then selected all vertexes of "pages" and used function "checker deselect" (first time I've heard about this function) to have the selection jump on every second vertex. I've used this to shuffle every second page around. It should look more organic in theory, but you can't really see this in the result, unless you zoom in.
Originally, I wanted to do some kind of random displacement of each loopcut (page), like I've seen Ian Hubert do in his youtube videos, but I am too much of a noob and decided against, as I didn't want to spend half of a day learning how to work with this part of Blender.
Whole process took me less than an hour, and I was quite happy with it. Next I wanted to add a little dent to indicate the ridge of the book, like you can see in the image that I've used as an inspiration.
Blender is not intuitive software
The ridge / dent is in theory really easy. Just create a long stick, rotate it 90 degrees and do another bool modifier which will cut the dent in the book.

So I've done that and it didn't work. The result, even when I've applied the modifier, was a weird change in the mesh, which was basically invisible and certainly not what I expected.

I could see that there were some new loopcuts and a lot of weirdly positioned vertexes. But why didn't the boolean properly propagated into the model?

I've tried all kinds of tricks, like to "apply transforms", add new knife cuts so that booleans have points to link themselves to, even "recalculate normals", but nothing helped.
I've googled, but with no luck. After some time, I've even tried to manually cut the dent, but thrown away the whole attempt after some time when I've managed to trash it. That is really easy when you manually play with vertexes.
In the end, I couldn't solve the problem, so I did a workaround and moved the dent slightly to the right, before the place where the bevel starts. Suddenly, boolean worked as expected.
I think that I've spent hour, maybe more, by trying to understand the problem, and do all kinds of handwaving, like trying to "apply remesh" and "solidify" modifiers in random order to see whether it can help me.
Edit: A solution
When I finished this article, I've got curious and created a test version from the commit created right when the basic book shape was done. Then I've applied boolean on it and it didn't work, exactly as expected. Now when I created a test case for quick exploration of what is going on, I could finally maybe understand the problem.
I've remembered, that I've had problem with booleans and (nurbs) curves before, and friend pointed me to this warning in boolean's documentation:

Great. What the heck is Manifold? Wikipedia isn't really helpful:
In mathematics, a manifold is a topological space that locally resembles Euclidean space near each point. More precisely, an n-dimensional manifold, or n-manifold for short, is a topological space with the property that each point has a neighborhood that is homeomorphic to the Euclidean space of dimension n.
And the documentation on what Non-manifold is also not that useful:
Non-Manifold meshes essentially define geometry which cannot exist in the real world.
I don't have any special geometry, do I? It looks pretty regular to me. I've googled more and found out article Repairing Meshes. This had finally led me to the solution and at least gave some idea where the problem was. I probably had some vertexes near each other, which created some weirdness, like faces inside objects and blender didn't know what to do with that.
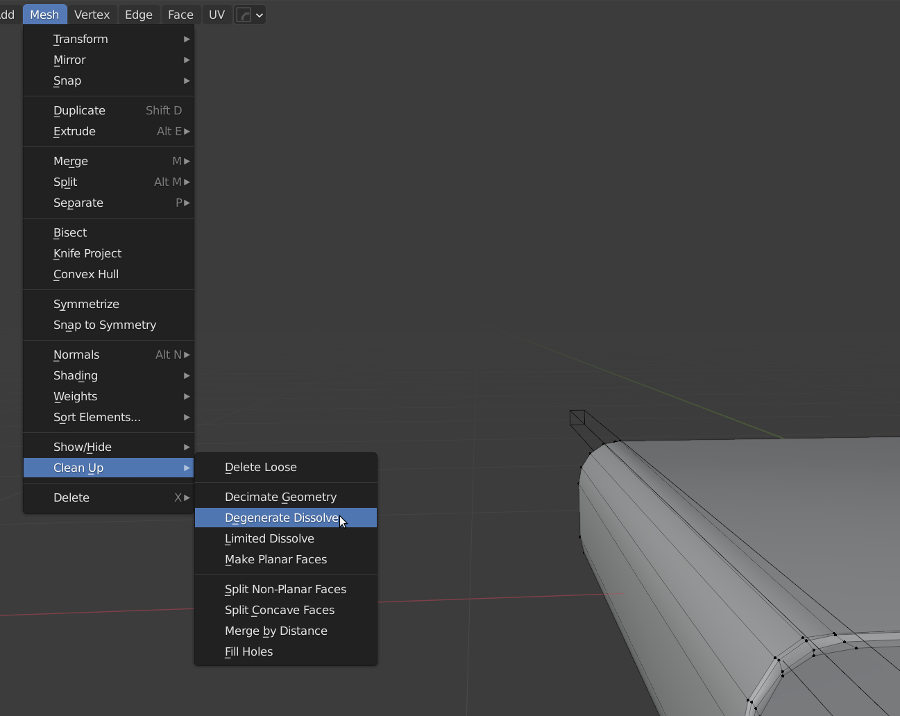
As the article suggested, Degenerate Dissolve option worked:

Blender shown this tiny message in the right corner:

Are you fucking kidding me? 3 vertices and 3 edges somewhere where I couldn't even see them cost me several hours of my life? It would be nice to have some kind of warning, that would tell you "hey, you are trying to do boolean and there are 3 vertices and 3 edges in the way!"
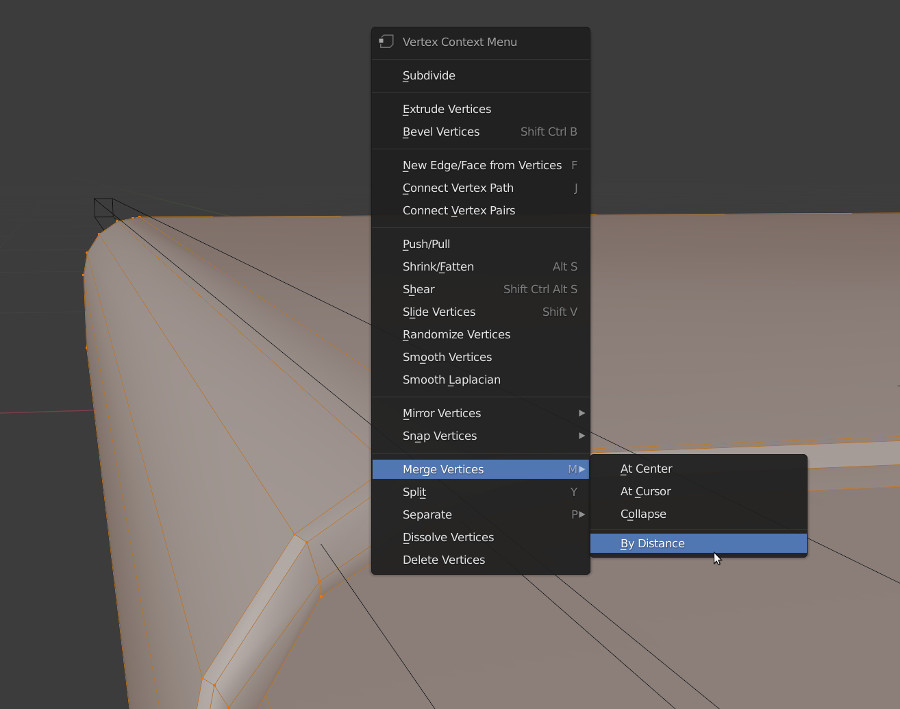
I've found out that Merge Vertices By Distance also works:

Here is the result. Please ignore that the cut goes all the way through the model, this was really just a test case to see whether the boolean works or not and I would position it differently in the original model.

Adding text
I've never worked with text in Blender before, so I've had to see few tutorials first. Then it was quite easy. At first, I just added several text objects on top of the model, then I've made them 3D, converted them to meshes and created boolean cuts in the main model.

It may sound complex, but it was all done quite quickly. Next, I've created simple 4x4 pixel palette in GIMP, using colors from some random image of a book from Google. Then I've added the pallet to Blender and configured the shader to use it.
I've used the trick for lowpoly models, to take uv unwrap of the item you want to colorize, minimize it until it is just a dot and then move it on top of the pixel you want.

Basically, I had to "uv unwrap" just two items - the pages inside and the cover of the book. The crazy topology you can see on the right is support system manually knifed on top of the book to support and clean artifacts from all boolean letters I've put there.
Next I've decided to put gold color inside the text reliefs on the book. I've just cloned the text, made it flat again, added a gold color shader and then shrink wrapped it on top of the book.

I was quite pleased with the result and I thought that I am almost done, just quickly render the book and it is done.
Problems with lights
I've underestimated how little I know about lights. I don't mean lights in Blender, but lights in general. Where to put them in the scene. How it will look. What looks good and what doesn't.
In the end, it took me maybe hour to realize, that I need at least three light points just so that the shadows and colors won't look like crap. Then I've finally rendered the first version:

But I wasn't really happy with how the gold color shines, or not shines in this case. It took me quite some time to position the lights into such positions, that it shined nicely and as a whole. But the image looked too dark.

There were also some crazy shadows going on, so I've spent some time trying to convince Blender to render the final image with transparent background. The result looks like this:

In the end, I think that the first version was better in everything, except for the gold letters, but I've simply lost will to toy with lights for another hour, to get the results I wanted. Good enough.

Lessons learned
I really wish that Blender would just throw some meaningful error, when it can't do something. It still feels like some kind of alien technology designed by people who knew way too much about 3D modeling, but at the same time knew nothing about basic human psychology. It is such weird mix of absolutely high level features, mixed with totally lowlevel knowledge. I am sure there are reasons why it can't do something, but how are you supposed to know them when you first encounter them?
With each new version, Blender really feels like it is more open for beginners and that it's functionality is explorable; that you can just go and learn by trying. But the reality is, that it is not. There are things that make no sense, unless you know some specifics about how it internally works and what kind of 3D magic it does.
Big lesson for today is that when booleans start to fail, then it is time to clean mesh from all internal faces and edges. It may help.
I also wish to be more effective. Not just in Blender, but generally with my approach to how I do stuff. I tend to spend way too much time on things that are not important for the final result. This is true for 3D modeling and also for programming.
